
A guide to setting up Unlimited Plans, Limited Plans, and Intro Offers in Walla, including billing, renewal, usage, and location settings.
This guide will walk you through the full setup process for creating Class Plans and Intro Offers in Walla, including:
-
Plan configuration fields
-
Billing and commitment options
-
Purchase and usage location rules
-
Settings that can or cannot be changed after saving
You’ll also find key tips for correctly applying alternative start dates, introductory discounts, and member perks to your plans.
✅ Follow each section carefully — some choices (like auto-renewal behavior and commitment length) are permanently locked once a plan is created.
🛠 Access Plan Management
To start creating a new plan:
-
From the main navigation menu, select Manage Services.
-
Choose Plan Management.
-
Select Add New Plan.
-
Choose either Class Plans (for ongoing memberships) or Class Intro Offers (for limited-time new client promotions).
Once you select the type of plan you want to create, follow the steps outlined in this guide to complete the setup.

📋 Before you start:
Make sure to upload your waivers, policies, and contracts under Business Settings > Document Center. This allows you to quickly attach them during plan creation without leaving the setup flow.
Set Up a New Class Plan
Below we go through every option, setting, and important callout you need to build your plans correctly the first time — and clearly outlines which choices are permanent once saved.
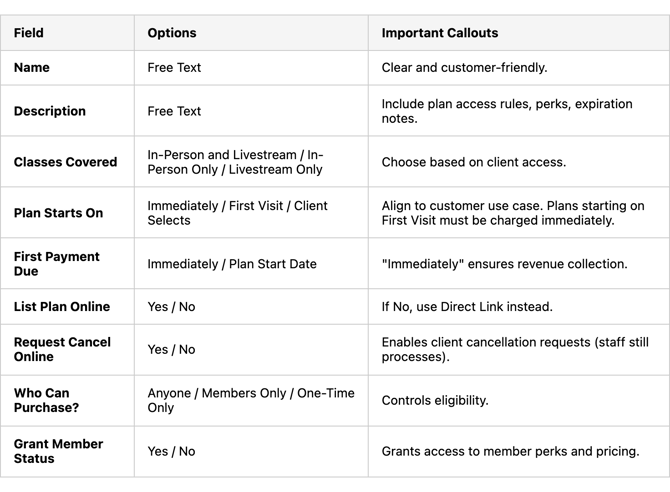
🛠 Section 1: Plan Details Setup
Tables can't be imported directly. Please insert an image of your table which can be found here.
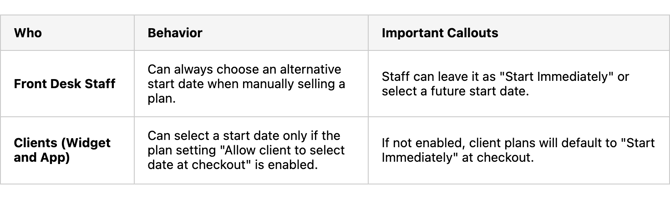
📅 Alternative Start Dates
There are two ways a different start date can be selected during plan checkout:
🛠 Section 2: Choose Your Plan Type
Unlimited Plans
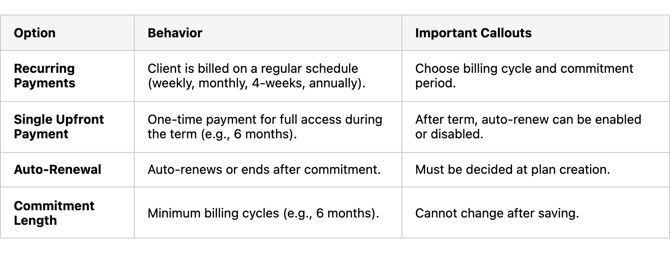

Limited Plans
A.Subscription-Based Limited Plans
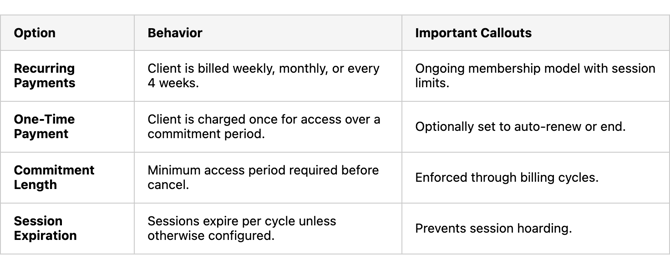
B. Usage-Based Limited Plans
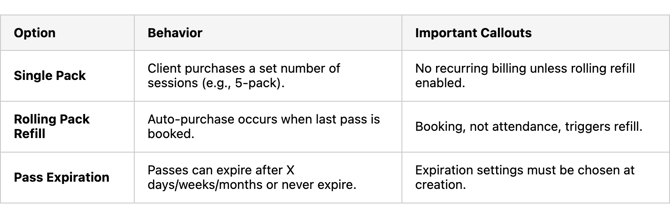

⚙️ Purchase Location, Usage & Contracts
When setting up a plan, you must define where the plan can be purchased, where it can be used, and what contract applies.
These choices are critical and permanently locked after saving.
🛒 Purchase Location Type
When configuring a new plan, you will choose one of two purchase behaviors:
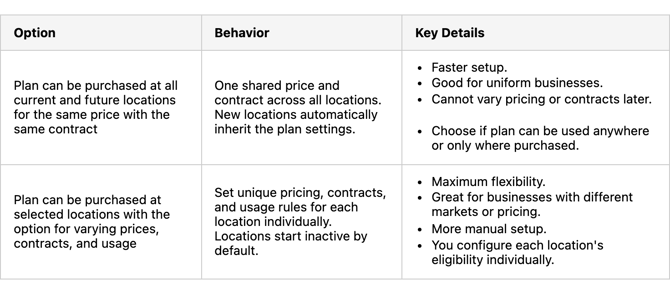
⚠️ Important:
Once you pick one of these options, you cannot switch later.

🛠️ If You Choose "Plan can be purchased at all current and future locations for the same price with the same contract"
After selecting the purchase model, you will choose how the plan can be used:
Tables can't be imported directly. Please insert an image of your table which can be found here.
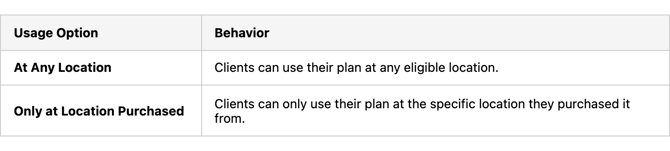
✅ This allows additional flexibility on how you control client access even if the plan was sold at only one location.

🛠️ If You Choose "Selected Locations" — You Unlock Per-Location Controls:
When you select Plan can be purchased at the locations selected with varying prices, contracts, and usage, you unlock a location-by-location control panel.
You will see this structure:
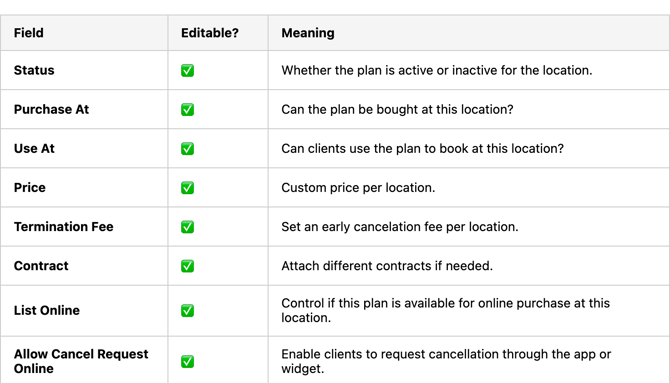
These fields are managed from the menu at the end of each location’s row after initial setup.
You can always change these specific per-location settings even after the plan is live — but you cannot change the original choice of "all locations" vs "selected locations".
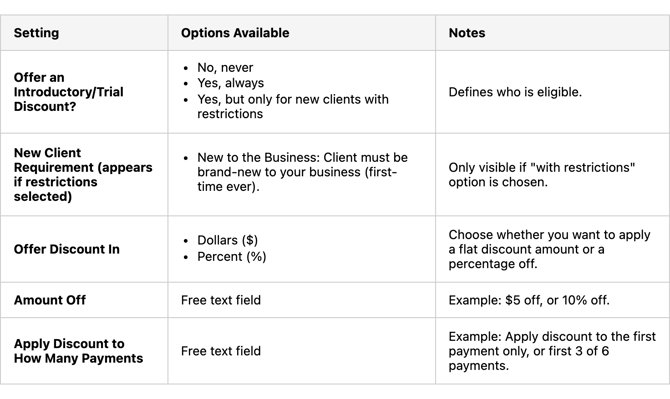
🆕 Introductory / Trial Discount
This discount is for new clients only.
When setting up a trial discount, you will choose:
👤 Member Discount
This discount is for clients who have Member Status.
When setting up a member discount, you will choose:
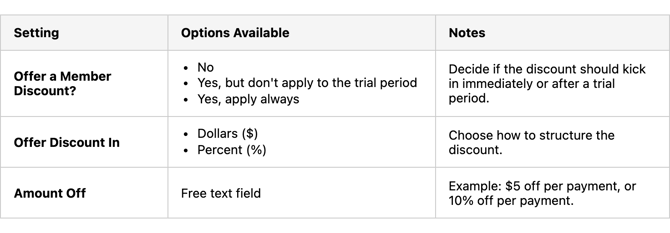
✅ Member discounts apply automatically to each billing cycle once triggered.
🛠 Section 3: Perks, Benefits & Fees
In this step, you can highlight extra value that comes with purchasing the plan.
These settings are optional, but can enhance the appeal of the plan at checkout.
Perks & Benefits
-
Use the text box to list custom perks you want to highlight.
-
Example: “Access to Member Lounge”, “Free towel service”, “Priority booking access”.
-
Each perk appears as a bullet point on the client's purchase screen.
-
Important: Perks are informational only — they are not enforced or connected to any automatic system settings.
🎥 Video-on-Demand Access
-
Check the box if clients who purchase this plan should have access to Video-on-Demand (VOD) classes.
Check the box if clients who purchase this plan should have access to Video-on-Demand (VOD) classes.
👥 Guest Passes
Set how many guest passes the client receives.
-
Guest passes are issued on the same cadence as the plan’s payment cycle (monthly, every 4 weeks, or weekly).
-
For annual prepaid plans, guest passes are still issued monthly.
-
Clients must book themselves into a class first before they can book a guest.
-
Guest passes cannot be pre-booked into the next billing cycle.

💸 Early Termination Fee
Set a fee if a client cancels the plan before fulfilling their minimum commitment.
-
Example: If a 6-month plan is canceled after 2 months, the early termination fee would apply.
- Note: The commitment period follows the billing cycle. If a plan is paused, the billing cycle is moved forward by the same amount of time, which also extends the commitment end date. Example: If a 5 month commitment is scheduled to end on 10/5 and the plan is paused for 10 days, the commitment end date will move to 10/15.
-
Leave blank or set to $0.00 if you do not want to enforce cancellation fees.
-
Important:
Early Termination Fees are not automatically listed in the client-facing plan description.
👉 It is recommended to manually add a note at the top of the Plan Description to make it visible to clients.
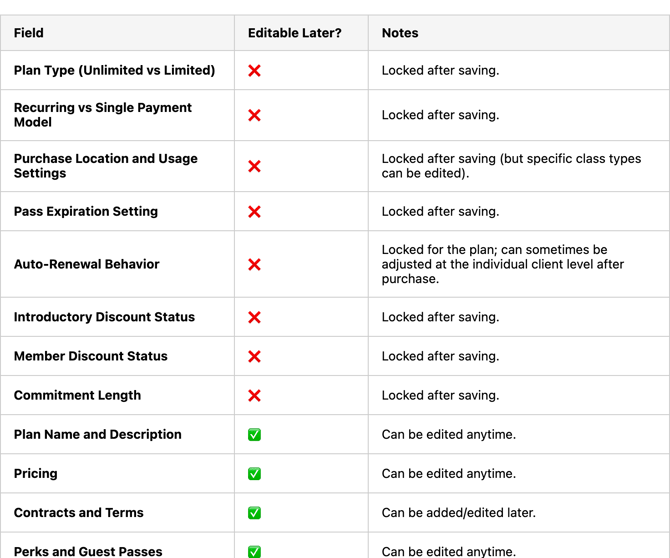
🔐 Plan Management Locked/Unlocked Settings
Once a plan is created, some settings are permanently locked and others remain editable.
Create a New Class Intro Offer
Intro Offers are value-based promotions that enable you to attract and retain new clients by allowing them to experience your studio, classes, and community.
You can create either an Unlimited Intro Offer or a Limited Intro Offer, depending on how you want to structure access.
✅ Note: Before adding a new Intro Offer, make sure your waivers, policies, and contracts are uploaded under Business Settings > Waivers & Terms for easy selection.
Follow these steps to set up a new Intro Offer:
-
From the main navigation menu, select Manage Services.
-
Choose Plan Management.
-
Select Add New Plan.
-
Choose Class Intro Offers instead of Class Plans.
-
Follow the steps outlined below.
Intro Offers allow you to sell a one-time, non-recurring promotional plan to new clients.
You can create either an Unlimited Intro Offer or a Limited Intro Offer, depending on how you want to structure access.
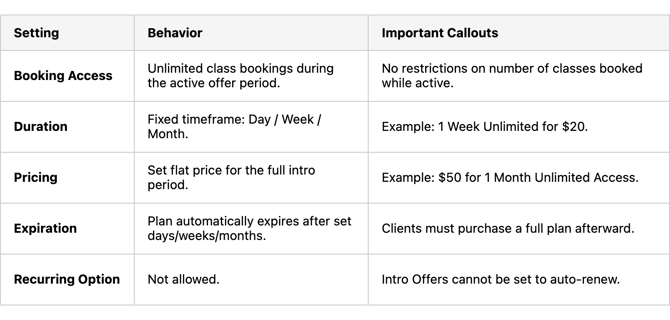
Unlimited Intro Offers
Unlimited Intro Offers provide unlimited class booking access for a fixed timeframe at a promotional price.
Limited Intro Offers
Limited Intro Offers provide a fixed number of classes available for a limited time, at a promotional price.
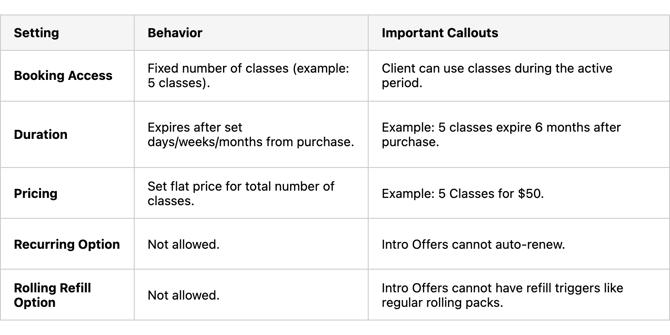
📣 Quick Callouts for All Intro Offers
-
Intro Offers are one-time only — they do not auto-renew and do not refill.
-
Once the intro offer expires, the client must manually purchase a full recurring or usage-based plan.
-
Unlimited Intro Offers allow unlimited booking during the period.
-
Limited Intro Offers allow a set number of classes before expiration.
🛠 Intro Offer Purchase Location Settings
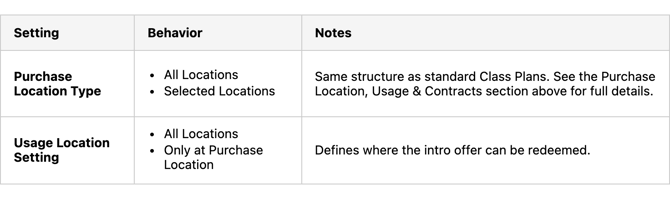
✅ Intro Offers also have purchase location and usage settings!
When creating an Intro Offer, you must also define where the offer can be purchased and where it can be used, just like standard Class Plans.
⚠️ Important:
Once you choose Purchase Location settings for an Intro Offer, they are locked and cannot be changed later, just like regular plans.
✅ Refer back to the main Purchase Location, Usage & Contracts section for a full explanation of your setup options and permanent decisions.